Thursday, February 27, 2014
This blog has moved
This blog is now located at __FTP_MIGRATION_NEW_URL__.
You will be automatically redirected in 30 seconds, or you may click here.
For feed subscribers, please update your feed subscriptions to
__FTP_MIGRATION_FEED_URL__.
Monday, March 09, 2009
Do-it-yourself (DIY)

Apologies again to the audience of maybe 2 people who ever stumble across and read this blog and wonder if I am ever going to write anything else. What can I say...I've been busy trying to be a better employee, husband, father, and a do-it-yourself first (and last) time homebuilder. I hope there has been progress made in all areas; however, the home is the only one that you can really see true progress because it's measured in things completed and how close you are to the ultimate goal of moving in. I'm beginning to think that the moving in part is just going to be the closing of chapter one. OK, maybe more like volume one since I could, and arguably should have, written many chapters about everything that has been done, learned, done wrong, etc. over the last year when we started planning this endeavor.
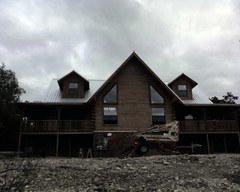
Fast forward from December......We have the wiring finished, sheetrock hung, most walls painted (some multiple times), hardwood flooring laid, custom cabinetry built and installed, granite countertops installed, one bathroom nearly finished, and a toilet that is actually usable! Still much to be done, but it's getting there!
Now to the DIY topic as stated in the title of this entry. My wife and I wanted hardwood flooring in a large portion of our house. We were concerned about the cost of said flooring. We toiled about just installing carpet and then down the road replacing it with wood. Given the amount of money we are paying for this home, I just couldn't see choosing flooring that would be considered throw-away. It seemed smarter to pay a little more up front to get something that would last the lifetime of the home (or at least our lifetime) that had a single 1-time cost. Additionally, I have been wanting to do things as "green" as possible. I don't like the idea of trees being cut to build our house, which is something great about Satterwhite Log Homes because they harvest dead-standing timber for their logs. This led me to wanting to use reclaimed flooring for our house -- namely Longleaf pine (aka. Heart Pine). This is something that I believed was only available these days as reclaimed lumber since most Longleaf forests in the US have been decimated. I found a local small business who focuses on lumber reclaimation who had enough wood to do our floor. The cost was high, but fairly close to our budget, however we had some concerns about it. At about the same time, our general contractor, Robert Jean, had discovered a mill called Woods of Mission Timber in North Texas. They had fresh cut Longleaf pine flooring that he said was beautiful. So here is Todd's new line of thinking on green: Green is good -- if the cost isn't prohibitive to the alternative. At a savings of $1/square foot for a better end-result, I couldn't resist the fresh cut lumber. That's OK...don't worry, I found a way to make up for it. Instead of doing a traditional floor finish with a polyurethane sealant, I chose a completely green product with 0% VOC. It's called "Rubio Monocoat", and seems too good to be true. So much so that they claim that's something all their loyal customers thought the first time they discovered the product too. After a bit of research, I made the bold decision to buck the way 90% or more of people in the US finish their floors and ordered this product online from one of the two only distributors in the US. So that's the backstory to the flooring....
With the floors having been installed by us (with help from the brothers-in-law) previously, it was time to get them finished. Our contractor had gathered quotes for having a flooring contractor come in and sand and finish the floors. It was going to be $2.50/ft^2. That would be over $2,000! No thanks! Here's where DIY gets crazy. I decided I would sand the floor myself. How hard could it be? I started researching the process and discovered numerous references to how professionals do the job with a "drum sander". Each of these had remarks about how a novice could *destroy* your floor with a single mistake. That's comforting! These remarks appeared nearly every time I found "how-to" info on the web. This had me discouraged about my abilities to the point that I was looking for an alternative and "easier" way to do it. Apparently I'm not alone in this area since I found many recommendations for using a "square-buff" sander which is more forgiving to operator errors. So with my decision made on the easy-way, I solicited help from my compadre Peter. He was eager and willing to help with this because it was something he's never done....and Pete is always up for a challenge to learn something new which is why he's so successful. Saturday (3/7) was the start date, so of course on Thursday evening I was still looking around getting plans made. That's when I stumbled across a series of videos produced by Clarke, the company who makes these sanders that Home Depot rents. How great is it that in todays world of the Internet that a company has the brains to make a series of videos and throw them out on YouTube? It's mind-boggling when you think about how things have changed in the last 5 years due to the rapid evolution of the internet. So here I am watching this guy sand floors with the ever-so-dangerous drum sander on my laptop when I say to myself, "Hey, I could do that!" So, I send an email to Pete telling him to watch the videos too. Saturday morning arrives and I head to the Orange super-giant and small business killer that I despise yet spend countless dollars at to rent the beast of a sander. I walk up to the counter and tell Eddie the rental guy what I need and what I plan to do with it. He asks me if I have ever used one of these before. I replied, "No, but I've watched a video on the Internet." As the words came from my mouth, I realized how stupid I probably just sounded to 60+ year old Eddie the hardware know-it-all. He looks me square in the eye and states, "You know how easily you can DESTROY your floor with that thing don't you?!?!" I felt like Ralphie from the movie "A Christmas Story" being told, "You'll shoot your eye out kid!" Knowing that Ralphie nearly did shoot his eye out after getting his Daisy Red Ryder carbine-action 200-shot range model air rifle near the end of the movie scared the hell out of me. Maybe Eddie the wearer of the orange vest really knew that I was incapable of imitating what I watched once in a series of 5 minute YouTube videos! So I just did what Ralphie did and insist I get what I wanted and would deal with the consequences of my actions later.
After building such amazing suspense over something as mundane as sanding a floor, like Mr. Miagi did with Daniel-son in teaching Karate through floor-sanding, I am going to just cut to the finish line. Sunday night rolls around and the floor is completely finished: sanded, oiled, the whole works. The ONLY problem we had was with the easy-to-use square buff sander. It snagged two boards and left chunks missing. They can be fixed with a little work. The evil drum sander worked flawlessly. I can certainly see how it could do major damage, but they've built it so DIY idiots like me can do nearly as good a job as the professionals. With Pete's free labor (I owe you big-time Pete!), the $300 for the oil and floor cleaner, the rental of the sanders and sanding belts, pads, etc. it came out to around $600 to finish the floor myself. Quite a DIY savings from the $2,000+ that was the alternative.
Thursday, December 11, 2008
Moving forward
I guess I haven't quite kept up with the house progress here like I planned. Building a house, everyday family, and a full time job are to blame - or at least are my excuse. I will, however, pat myself on the back for keeping up with a fairly decent photo diary on my Flickr.com site.
Satterwhite did their part and left in mid October. Since then we've had the roof put on, the plumbing done, AC installed, built a pumphouse (still needs work), done most of the electrical wiring, had really cool insulation installed, stained much of the cedar and logs, dug and filled trenches, and a whole lot more. It feels like a ton of work, but we still have so much left to do. Once the electrical wiring and some simple framing carpentry is completed, we will be ready to hang the drywall. We're hoping that things will really move fast after that is completed. Our goal was to be in the house by Christmas. That then became by the new year. Neither are going to happen, but hopefully it won't be long afterward. We have until the end of July, but please say a prayer that it won't take that long!
Tuesday, September 30, 2008
Moving fast!
It's been a wild weekend! Tim Whitfield Construction from Longview, TX arrived and *attacked* the homesite with his crew. As of this afternoon, the "stacking" logs should be finished. I can't express enough how efficient these guys are. They really know what they're doing, and it's obvious they have done it MANY times before. Next up is the interior framing and then the trusses. More to come......

Wednesday, September 03, 2008
Foundation and well

We finally have the beginnings of a foundation and water well. Hill Country Water Well in Briggs, TX has drilled our well to a depth of 580 feet. It's cased and ready to have the pump and tanks installed! Satterwhite returned yesterday to finish digging the footings, and then 3 trucks delivered 30 yards of concrete to fill them in. A & W Well and Water from Bertram, TX is beginning work on installing the well storage and pressure tanks and the pump. Next up....the septic! Still waiting to hear when construction on the foundation and everything above it will begin -- hopefully next week!
Thursday, August 21, 2008
An adventure begins
I created this blog with no real purpose initially, and of course it has sat unattended for a few years now. It now has a purpose! This will become the log/diary of the adventure of my family building our first home. Not just any home...a LOG home, which has our dream home for many years now. After researching and visiting a handful of builders all across the great state of Texas, we settled on Satterwhite Log Homes. Today I was reminded of why we chose them. Yesterday was the first day of construction, and they ran into trouble with rocks. Just in case you don't know, Interstate Highway 35 in central TX forms a boundary between coastal plains (farmland) to the East, and the very rocky Hill Country to the West. Long story short is that the rocks were an unforeseen problem that almost threw a wrench ($$$) into what was supposed to be finalized pricing. Today Satterwhite stepped up to the plate and is going to make everything right. The "warm fuzzy" feelings my wife and I got, which helped us decide to choose them as our home builder, are still there. They are good people, and so far, good to their word.
Friday, January 25, 2008
Blogger posting via FTP
So we're working with White Whale Web Services to redesign the Southwestern University web site, and in a discussion with them yesterday I learned that you can use FTP to publish a Blogger site to a different server. Cool!
Subscribe to:
Posts (Atom)
